Specification:
Item Type: Radio Frequency Skin Machine
Output Frequency: 50/60HZ
RF Energy: 10-50K
Pulse Frequency: 50us ~1000us
Temperature Adjustment: Cold -20 to hot 43
Power Consumption: 175VA under
How to use:
Connection cable installation method
1) Connect the electrode wire to the electrode wire socket on the back of the main unit.
2) Connect the electrode wire and the negative pole.
3) Connect the power cord to the power socket on the back of the host.
How to use the syringe
1) How to use 5cc syringe holder
Loosen the syringe fixing screw counterclockwise.
Insert the 5cc syringe in the direction of the arrow.
(Combine the injection port of the syringe with the injection port of the injection solution)
work method
Press the ON (l) button on the power switch on the back of the host to start the device. (When the "Zero start...!" notification and alarm sound appear, turn the knob counterclockwise to the end, and then turn on the power again.)
Set the mode and irradiation value of the main screen according to the following methods
a After selecting MODE, use UP/DOWN to set PULSE+ or PLUSE-.
- Setting range: PULSE+, PULSE-
b After selecting TIME, use UP/DOWN to set the usage time.
- Setting range: 1 minute to 20 minutes (increase/decrease unit is 1 minute)
c After selecting ACTIVE, use UP/DOWN to set on time.
- Setting range: 50us ~ 1000us (increase/decrease unit is 50 Step)
d After selecting REST, use UP/DOWN to set off time.
- Setting range: 50us ~ 1000us (increase/decrease unit is 50 Step)
- Setting range: HOT-30 ~ 43 (1 Step), COLD--18 ~ 20 (1 Step)
f After turning on the VOLUME on the main unit, STOP will switch to RUN, and then output low frequency, warm and low temperature.
g Rotate VOLUME to the right in the RUN state to adjust the INTENSITY value of the screen.
- Setting range: 0 ~ 100 (increase or decrease unit is 1 step)
h The Hz value on the left side of the screen will be automatically input according to the set value of ACTIVE and REST, and the user cannot adjust it at will.
i When you want to save the current setting value, after selecting the desired save label, press SAVE on the right side, and the setting value will be saved in the selected label.
- You can save Time, Temperature, Active, Rest values.
(The output value you want to use increases gradually from small to large.)
Hold the negative electrode in your hand or touch the body of the operator.
Put treatment head at the front end of the handle on the skin, and wait for the output of low frequency, cooling and heating.
Rotate the knob on the main unit to adjust the strength of low frequency output, use low-frequency, cooling, and heating output.
Management method after use
1) After use, be sure to turn the knob on the main unit to the end in a counterclockwise direction
2) Press the power switch (O) button on the back of the main unit to turn off the power and unplug the power cord.
3) If there are foreign objects on treatment head of the handle, please wipe it with cotton gauze or a dry cloth dipped in alcohol to ensure the cleanliness of treatment head.
4) After use, the handle and electrode wires should be placed on the shelf, and the connecting wires should not be entangled.
Fuse exchange method
Prepare a flat-blade screwdriver.
Exchange the Fuse of the Fuse holder. (AC 250, 4A)
Press the Fuse holder in the direction of the arrow mark and reinsert it into the AC INLET.
How to inject distilled water
Prepare distilled water and an empty bucket.
Connect the distilled water filling pipe to the distilled water injection port and the distilled water discharge port on the back of the main unit.
Put the tube connected to the distilled water inlet into the distilled water, and put the tube connected to the distilled water outlet in an empty bucket. (When injecting distilled water, the distilled water should be located higher than the equipment.)
After pressing the "distilled water button" on the main screen, "FILL UP WATER" will pop up. Then press ON to start pouring distilled water.
After the distilled water in the equipment is full, the distilled water will be discharged through the distilled water outlet. At this time, press the OFF button in the FILL UP WATER window to stop filling with distilled water.
Remove the distilled water filling tube by pressing the following identification part.
Note:
Do not start the device in an inclined or swaying place, as this will cause the system function to decline and the risk of fire or electric shock.
Do not use the device where there are chemicals or gas.
Do not use the device in places where temperature, humidity, air pressure, etc. have adverse effects on the device.
The equipment must be grounded. Turn off the power when the device is not in use.
Do not use it in the field with large temperature differences.
Precautions in use
Electric sparks may cause the flammable liquid and gas in the electrode to catch fire. Please confirm before using the machine.
Whether it contains flammable gas.
When applying the negative plate, make the whole surface fit completely. If there is space in the area where the negative plate is applied
Will cause burns.
If the negative electrode is in poor contact and connection, it may cause burns due to output errors. Please be careful before use.
Must confirm.
Pay special attention when using the negative electrode. Keep it when not in use and keep it away from people.
Patients transplanted with pacemaker or pacemaker electrodes may affect the function of the pacemaker and cause atrial
Trembles, so it is forbidden to use it.
Please stop using the equipment immediately and cut off the power supply when it is found to be malfunctioning.
In case of power failure, immediately turn off the power supply, and place the handle and negative plate in the original position.
In the event of a malfunction, take emergency measures first, and then entrust the sales company to repair it.
Do not modify the equipment.
Features:
1Reduce Delays: Reduce risk of pigmentation after inflammation, and make it more comfortable and convenient to use. 2Stable Electroporation Technology: Efficient solution penetration performance, does not damage skin surface. 3Anti Aging: Promote lymphatic circulation, dissolve fat, rebuild the skin and increase elasticity. 4Wide Range Of Applications: Suitable for laser, microneedle and other medical post repair care and second introduction. 5Stimulate Skin Tissues And Hair Roots: Increase skin elasticity, achieve good anti aging effect, electroporation penetrates into the SMAS layer.
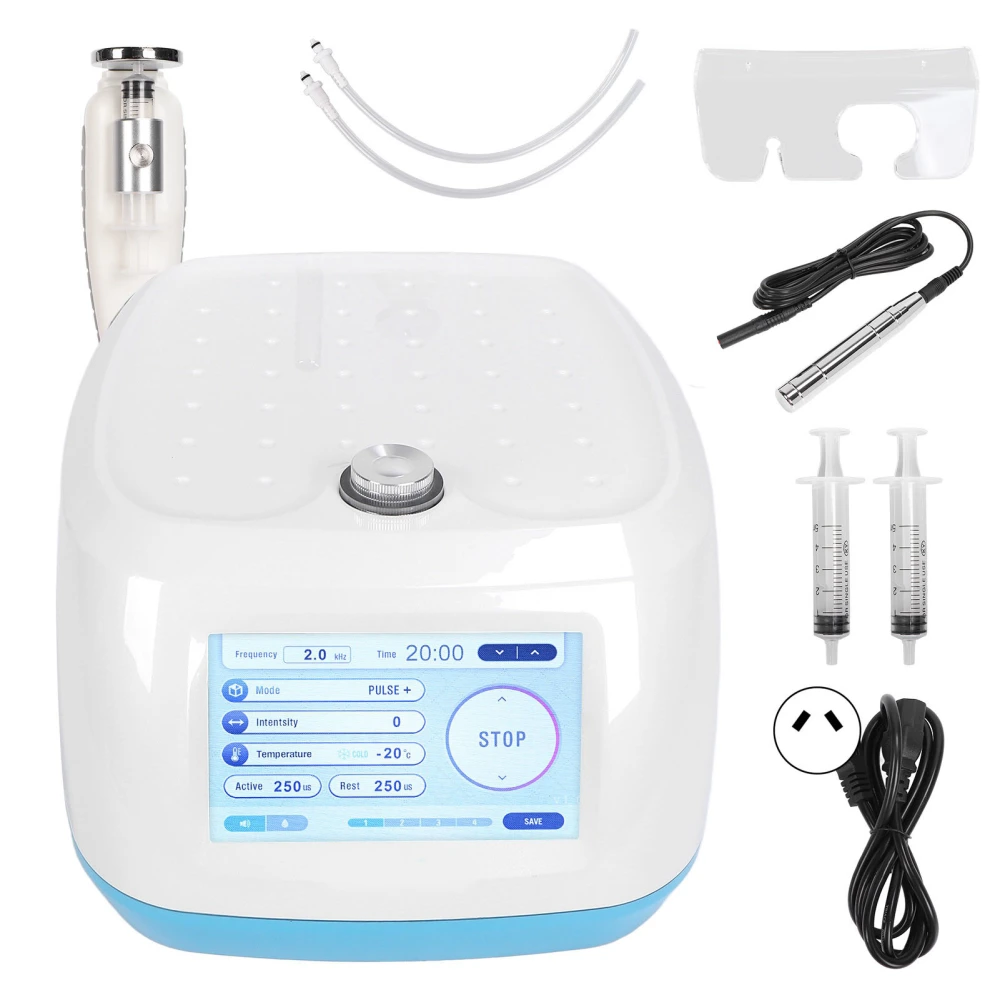
Package List:
1 x Host
1 x Manual
1 x Negative Pole
2 x Water Injection Pipes
1 x Power Cord
1 x Bracket
2 x Syringes