Specification:
Condition: 100% Brand New
Item Type: Magnetic Resonance Analyzer
Material: ABS+Stainless steel
Prohibited Groups: People with disabilities, pacemakers, long-term medications, menstrual women;
Instructions for Use: Installation instructions: You must exit the antivirus software in the computer before you can put the CD with the antivirus software into the CD.
Installation Process:
- After inserting the installation CD of the weak magnetic field resonance analyzer into the CD drive, the installation program will proceed automatically (if it does not run automatically, please enter the CD and double-click the file Setup.ExE), the computer will automatically run to the window in Figure 1, click The "Next" button in the window of Figure 1;
- Select the program installation directory and program group. After the selection is complete, click the "Install" button to install the program.
- After the installation is complete, click "Finish".
Note: Install for Windows98/Me operating system, the computer needs to be installed with Microsoftoffice at the same time, the system can work normally: Installed to for Windows 2000/XP/Vista operating system, the system can work normally without other software support; install for WIN7 / for WIN8 / for WIN10 system, you should click to install the program, click the right mouse button to select "Run as Administrator", otherwise the program cannot mobilize the external encryption lock program and cannot be started.
Software instruction manual: System interface (1) Enter the system: Click "Program-Weak Magnetic Field Resonance Analyzer-Weak Magnetic Field Resonance Analyzer", or directly double-click the shortcut icon of Weak Magnetic Field Resonance Analyzer on the desktop:
Personnel management (1) In the personnel management interface, click the "Personnel Management" button on the toolbar, and the "Personnel Management" window will appear (as shown in the figure below). This window needs to manage the basic information of all inspectors. The left side is the customer's management file, and the right side is the "basic information" and "test record" of the selected customer.
(2) Customer file management is mainly to manage customer information, including: "adding" inspectors, group "modifying" inspectors, group data "deleting" inspectors, group data on inspectors "Find" + group management is mainly to divide users into multiple groups for easy management of users. Click the "Add" button in the group section to add a group. (As shown on the right) Click the button "Save" to add a new group. Click "Edit" to modify the group name and click "Delete" to delete the group. (Note: If there are already people in the group, you must delete the detected person before you can delete the group)
Detector management: Click the group name on the left to turn it blue, and then click the "Add" button in the Detector section (as shown in the figure below) to add the newly added person to the corresponding group. The information of the detected person is as shown in the following figure. Enter the name, gender, birthday, (in order of January 1st of the year), height, weight, and other necessary information, and then click the "Save" button. (Note: The name, gender, birthday, height, and weight must be entered, and other content does not need to be entered);
(3) Inspection record management is mainly to manage the customer's inspection records (see the figure below for details), including inspection date, inspection time, name, age, gender, etc. Click on the corresponding customer on the left, and the details of all inspection records of that customer will appear on the right (in reverse chronological order).
Detect
(1) Start detection: Select the person you want to detect on the left, make it blue, and then click the "Start Detection" button on the toolbar, and then click the "Start Detection" button on the picture:
(2) The detection process prompts the subject to hold the test stick with his left or right hand. During the detection process, the subject is required to relax, not to speak, and to maintain breathing balances:
(3) After the detection is completed, click the "Save All" button.
Get Report
(1) After the test is completed, the system will automatically return to the personnel management interface, and select the tester just now, and the "test record" at that time, and click the "Get Report" button to automatically interpret and analyze, and get the report.
(2) On the left is a list of all reports, and on the right is the detailed content of a report. Click on the left to switch between different reports. At the bottom of the right, there is a "Comprehensive Report" button. Click this button to get all Comprehensive report of the report.
(3) When the report as shown in the figure above appears, you can "display the whole page", print, and save all the reports.
(4) After clicking "Full Page Display", the report as shown in the figure below will appear, and you can perform operations such as "Print", "Preview", "Save", and "Page Setup" on the report.
(5) "Comparative analysis" selects any two inspection records of a certain person, and then clicks comparative analysis, then the comparison of the two inspection results of this person can be displayed.
Expert Suggestion Management: Click on the toolbar "suggestion management", you can get the content shown in the figure below. It is mainly to manage the suggestions, and users can add their own products to facilitate the printing of the corresponding products after the test report comes out.
Header and Footer: Enter the header, footer, and the position of the header and footer (left, middle, right), and then click the "OK" button to set the report header and footer.
Backup and Restore Database:
The system supports the backup and restoration of the current database, so as to avoid computer problems or virus damage, it can retain complete data and reduce losses. Click on the toolbar: "Backup", "Restore" button to enter the corresponding program, click the "Start" button, select the save paths and file name or backup file, you can perform corresponding operations. Note: When restoring data, the system will automatically overwrite the current database, so use this function when the current database has important information.
System Settings: Mainly set up some personalized things of the system, so that the test results are more suitable for customers' own requirements. Click each button in turn (as shown in the figure below) to enter "Display Report Settings", "Parameter Settings", and "Sensitivity Adjustment".
Display Report Setting: Choose the report you want according to the needs of the customer, and screen some unnecessary reports.
Parameter Setting: Set whether to display the detailed description of each parameter in the report, which can be displayed or not displayed.
Sensitivity Adjustment: Sensitivity adjustment refers to adjusting the sensitivity of the instrument's detection rod. For example: the instrument is particularly sensitive and will automatically adjust the value, and the sensitivity can be appropriately lowered; when the instrument is difficult to detect for certain persons to be detected, the sensitivity can be appropriately increased.
Testing Procedures Testing Operating Procedures
1. When the computer power is not turned on, check whether the computer, detector, printer and other equipment are well connected, and the test rod probe must be inserted tightly.
2. Measure and record the basic information of the tested person (name, gender, date of birth, etc.).
3. Turn on the computer and check whether the computer, detector, printer and other equipment are operating well.
4. Remind the subject to relax, do not speak, and keep breathing steady.
5. Ask the subject to hold the test stick in his left or right hand.
5. Close all other applications, and open [Weak Magnetic Field Resonance Analyzer] for testing.
7. During the test, the skin of the testee should not be touched.
8. After testing, clean up the equipment and keep it in a good standby state.
Testing Room Working System
1. The testing room should be kept clean and quiet, and pay attention to the safety of electricity.
2. Before testing, remove the metal and communication equipment from the tested person and place them properly.
3. Those who wear a pacemaker should not be tested.
4. When going to work, check whether the power supply and detection system are in good working condition.
5. During the testing process, strictly abide by the operating procedures to avoid damage to the testing system.
6. When off work, cut off the power supply, organize the equipment and testing instruments used, and keep them in a good standby state.
Note for the Tested Person: Two days before the test, do not drink alcohol, coffee, eat healths products, and try not to take medicine. Two days before the test, he had regular life and normal sleep. After strenuous activity, rest for one to two hours before testing. The test should be performed on a semi-fasting stomach. Dress loosely and keep warm. Before the test, remove the metal objects and communication equipment on the body, relax the body and mind during the test, do not talk, and keep breathing steady.
Features:
1Updated software interface, richer sense of science and technology, and easy to operate. 2A comparative analysis report has been added to compare the results more clearly. 3The description of the new test interface is clearer, more scientific and accurate, convenient for use. 4Scientific inspection system database, strict healths statistics processing, several physical indicators can be checked within a few minutes. 5Simple and elegant appearance, equipped with a storage bag, portable design, easy to carry when going out.
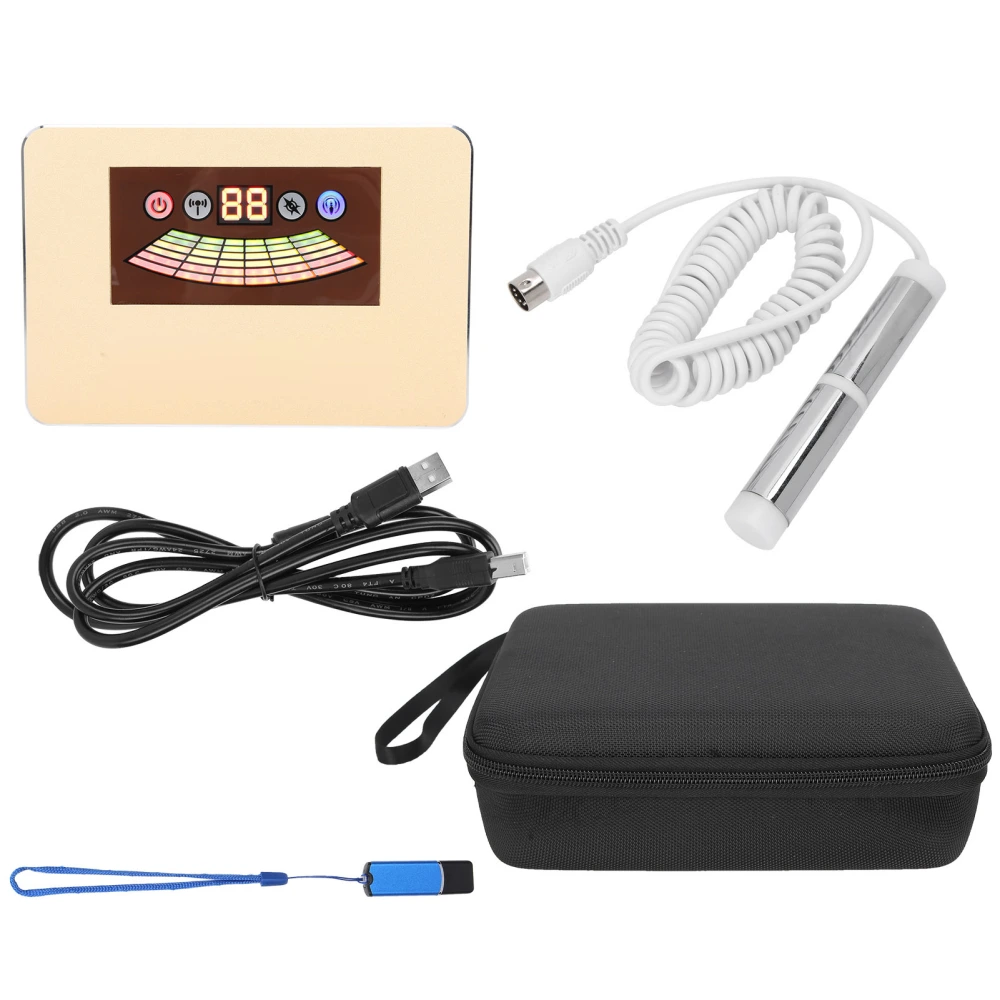
Package List:
1 x Host
1 x Detection Handle
1 x Software CD
1 x U Disk
1 x USB Cable
1 x Storage Bag
1 x Manual